Virtual Entities Part 2 - Cosmos DB
Introduction
Here is the second post of the series that will focus on connecting Virtual Entities with Azure Cosmos DB. Last time I covered basic concepts of virtual entities and now it's time to explore more friendly & flexible OOB connector for Cosmos DB.
Cosmos DB Connector
Last time we jumped straight to the point of creating a new data source in Dynamics 365, but this time we don't even have a connector installed on our instance. So the first step will be the installation of the connector.
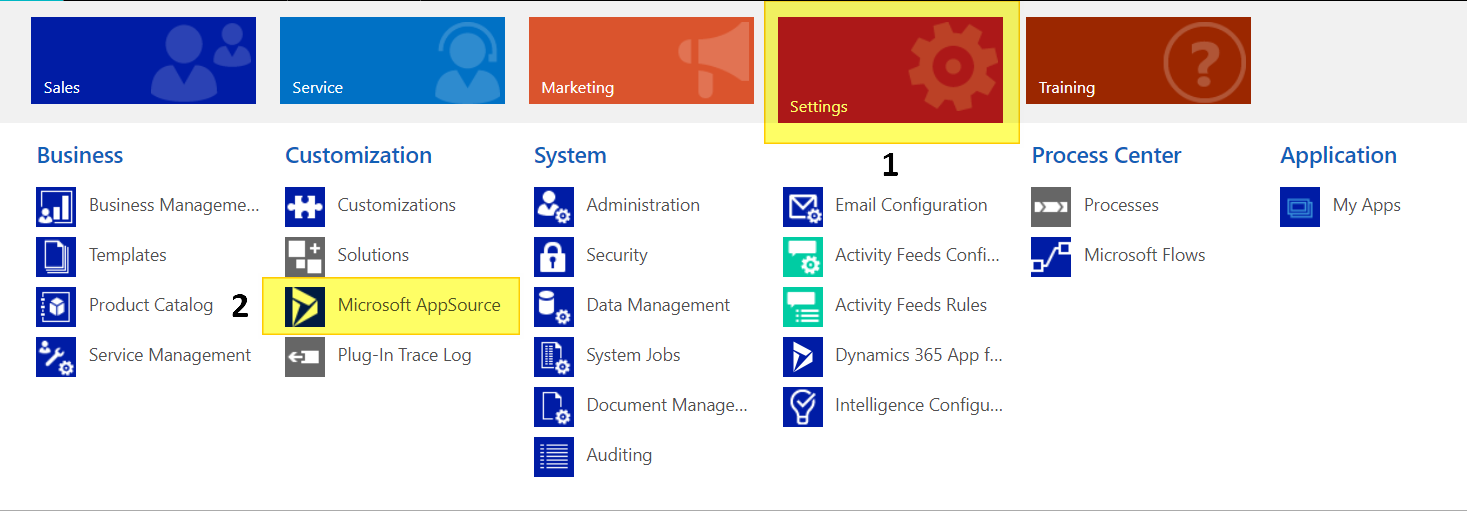
Thankfully installing the connector is not that hard since it's available on AppSource. You can open it by clicking Settings -> Microsoft AppSource on your instance.
When you get an AppSource popup all you need is to search for "Cosmos DB" and after you find it click on Get it now button.
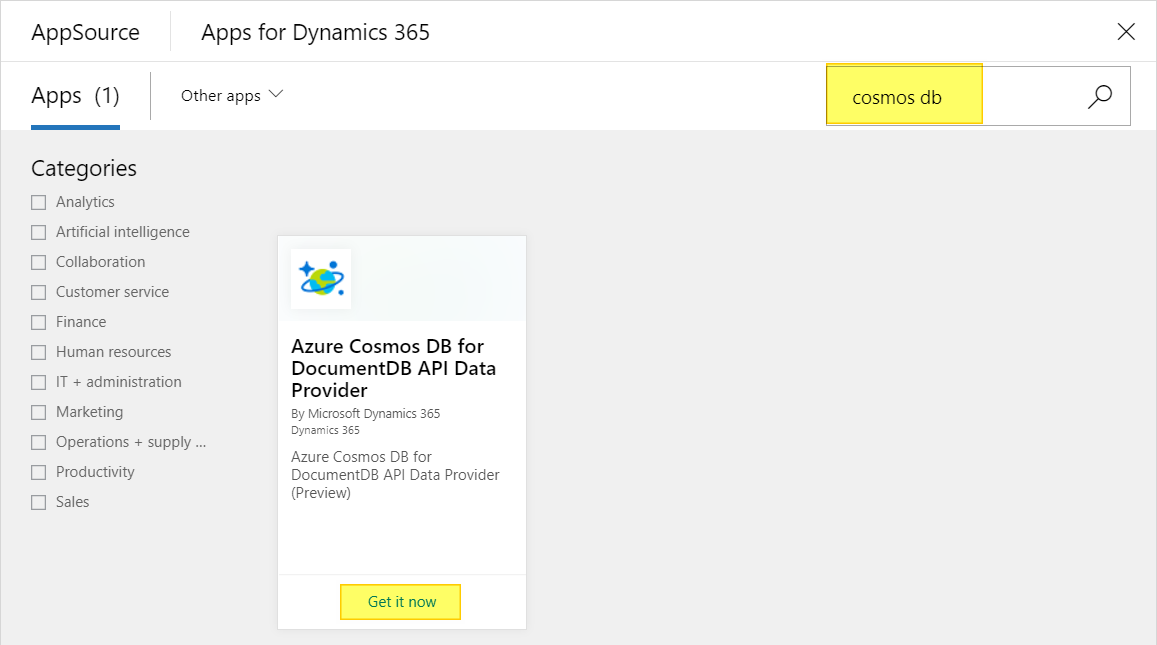
You will just need to select organization on which you want to install the connector and agree with terms and conditions.
It may take before connector becomes available on your instance, but when you see that DocumentDBDataProvider solution is added to your instance you are ready to start exploring.
Azure Cosmos DB
Before we get to the data source creating part we need first get an instance of Azure Cosmos DB.
Fist you need to open https://portal.azure.com and create a new resource. Click on Create a resource button, then search for "Azure Cosmos DB" and after you select is press Create button.
Now you need to input some of the crucial information for your Cosmos DB. After you select your subscription and resource group you need to choose the name for your DB which will be used later in the data source configuration. The most important thing here is API part. You MUST select SQL here because virtual entities don't support any other API method mentioned in the dropdown menu. Other parameters are your own choice.
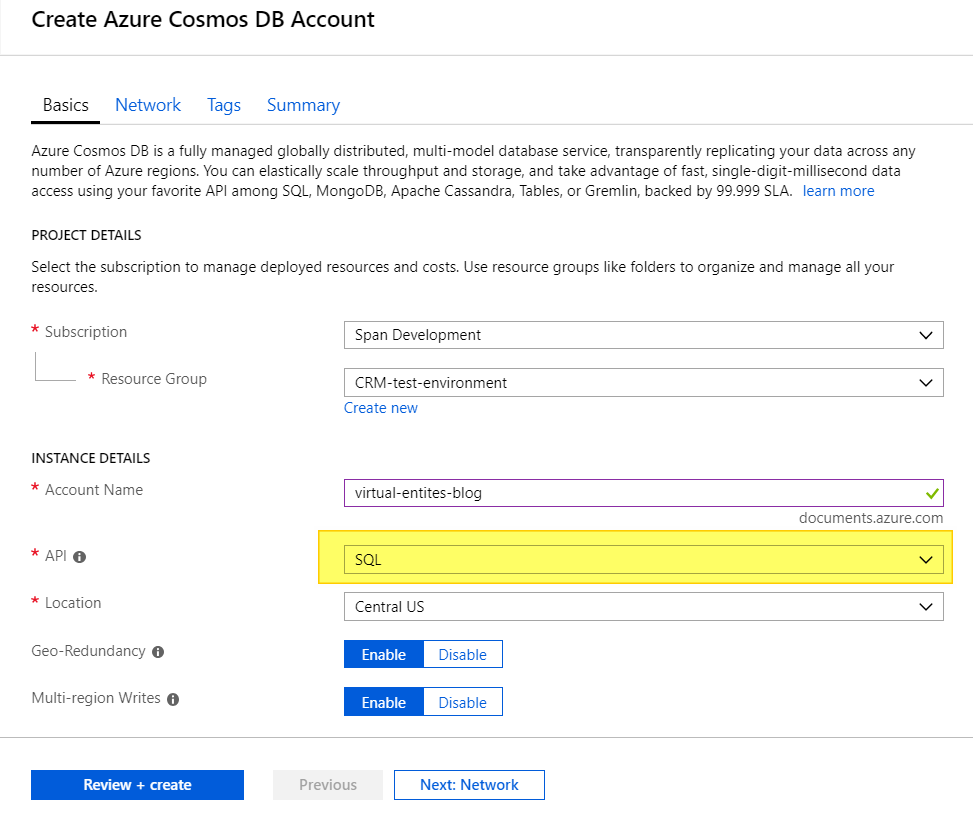
When you are done with your parameters form should look like on the image above and just be sure that API is set to SQL. After clicking on Review + create button you must wait a few minutes while your DB is being created in Azure.
When the installation process is finished we need to create the collection which will hold our documents. First, you need to open Cosmos DB resource that is created, then choose Data Explorer on the left menu. After data explorer is opened you need to press New collection button which will lead you to the collection configuration form.
You need to populate a few fields on the configuration form. First is, of course, creating a new database and after that, you need to choose a name for your collection (sensor-data collection will be used in this tutorial). I suggest you choose Fixed (10 GB) option for Storage capacity field and 400 RU/s for Throughput field for lowest cost option, of course, you can change it to whatever suits you best, but since this one is just for testing purposes I will go with the lowest cost option here.
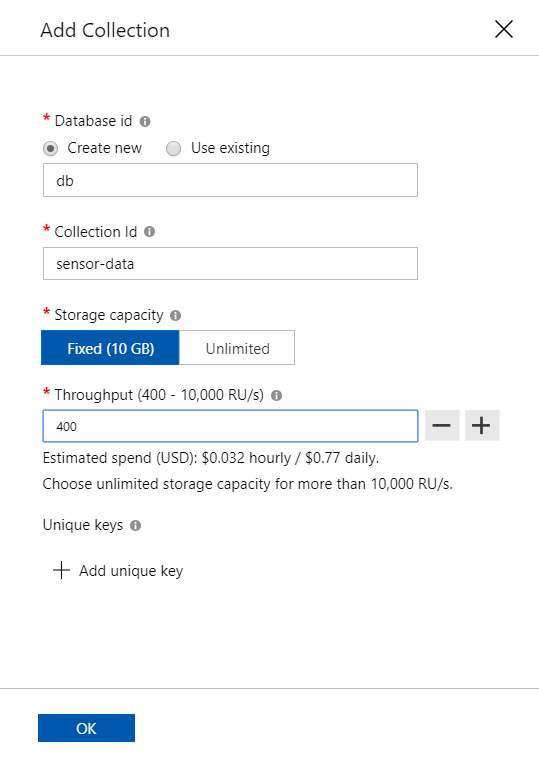
Pressing OK button will create your database and collection.
Creating Data Source
We have our database set up so we can jump to creating a data source. You need to open Settings -> Administration -> Virtual Entity Data Sources in order to create a new data source.
Click on New opens a dialog where you need to select Azure Cosmos DB for DocumentDB API Data Provider option from the dropdown menu. When you do so you will get Cosmos DB connector configuration form.
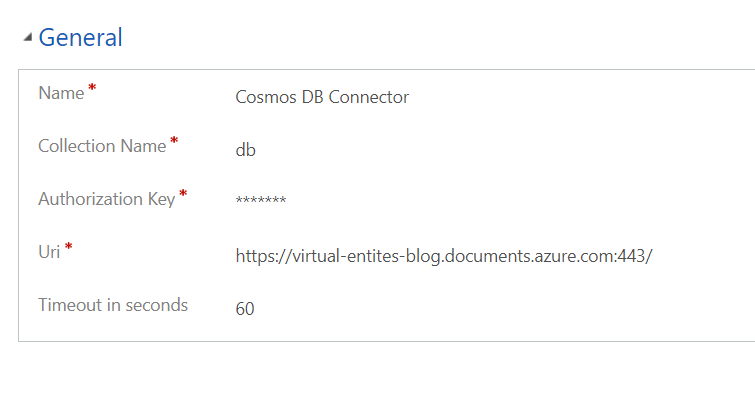
The first parameter is a name which is not that important and it can be something that you want.
The second parameter is Collection Name which is quite undescriptive and can probably lead to an error on your first try because it's not actually a collection name. In this field, you need to type your database name (db in our case).
The third parameter is Authorization Key which can be found on Cosmos DB resource page on the Azure portal. When you open your Cosmos DB resource you need to select Keys from the left menu. There you have your primary and secondary authentication key. Copy any of those 2 values to the Authorization Key field.
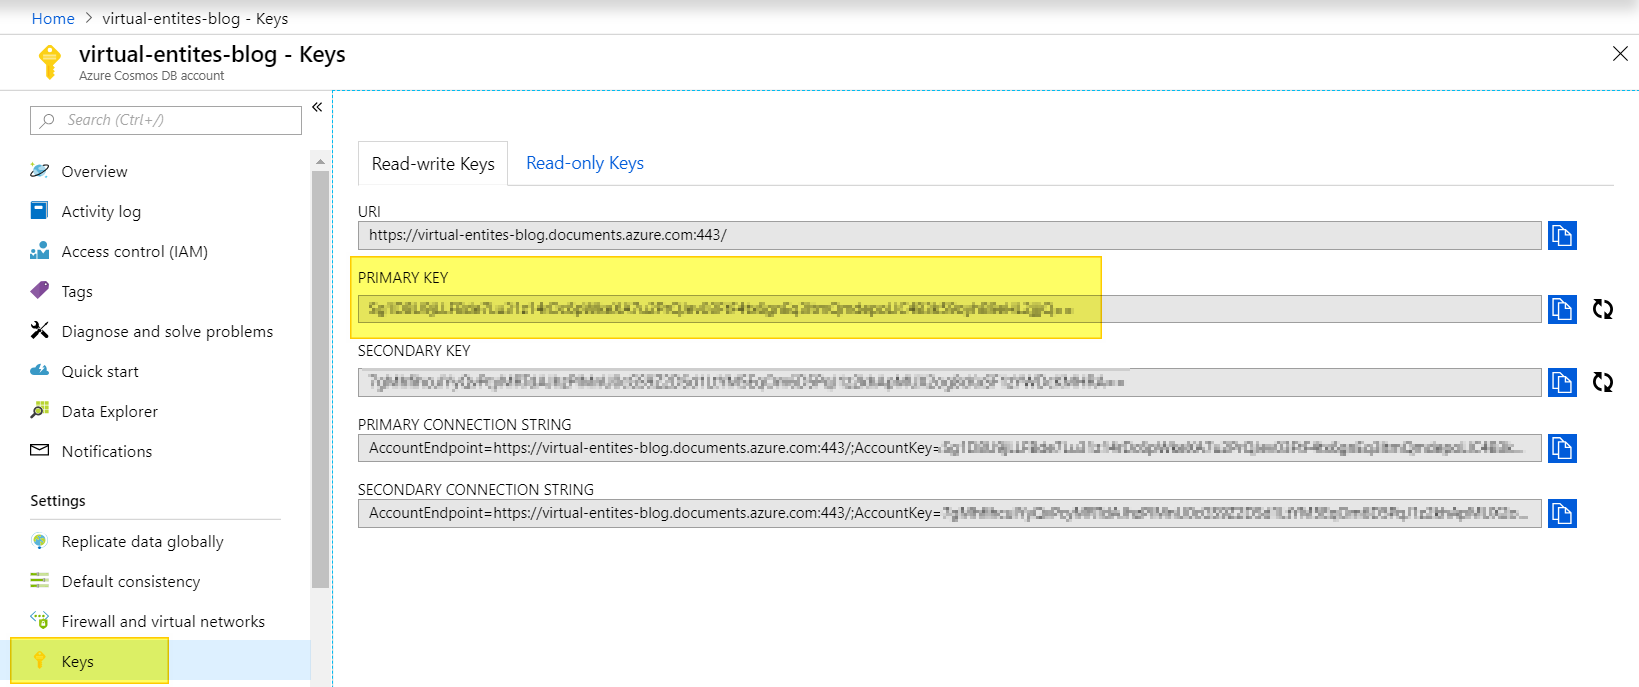
The fourth parameter is Uri that can also be found on the keys section. So copy/paste that value to the Uri parameter too.
You can leave Timeout in seconds field on the default value and click Save.
Now we have our data source ready to use.
Creating a Virtual Entity
Next step is to create a virtual entity on our Dynamics 365 instance. Go to your solution and create a new entity. First, you need to tick the Virtual Entity option and then you will get virtual entity related parameters to fill. Most important ones are External Name, External Collection Name and Data Source. External Name and External Collection Name must hold the same value and that value is the collection name of our Cosmos DB collection (sensor-data in our case). In Data Source we must select a newly created data source from the previous step. Final form must look like the one below.

We need to set primary field requirement to Optional because we will not use it in this example.

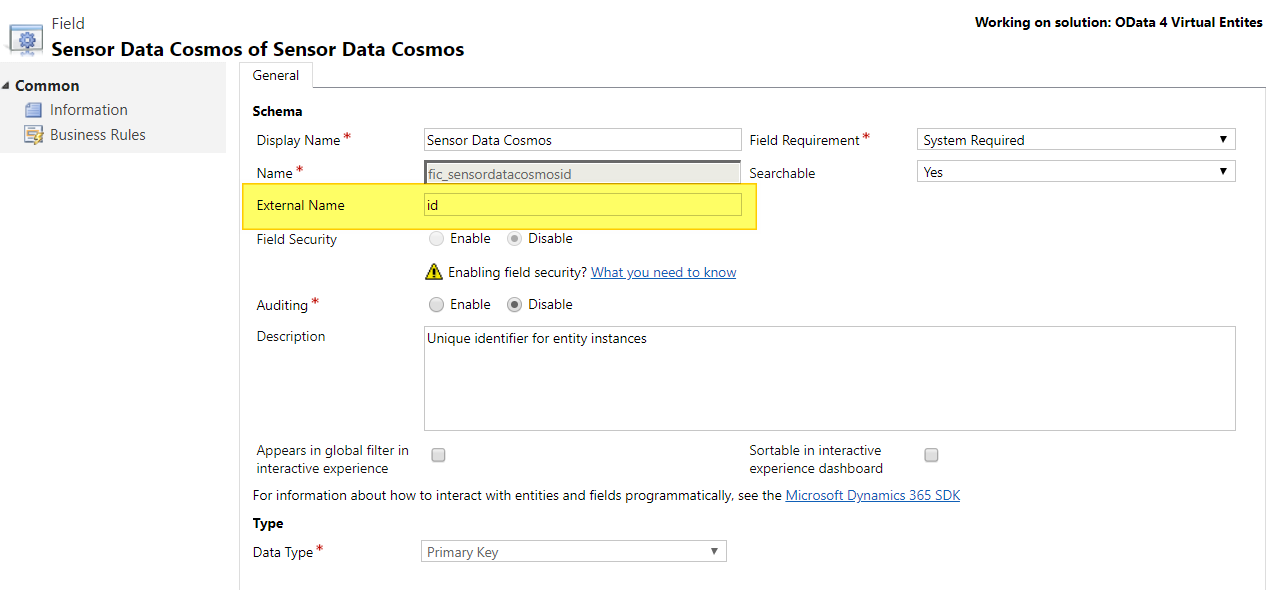
Next, we need to add External Name to our primary key field. Since we will use lower case key in our Cosmos DB documents we will set the value to id.
After that, we will add 2 more fields: Temperature and Sensor Type field.
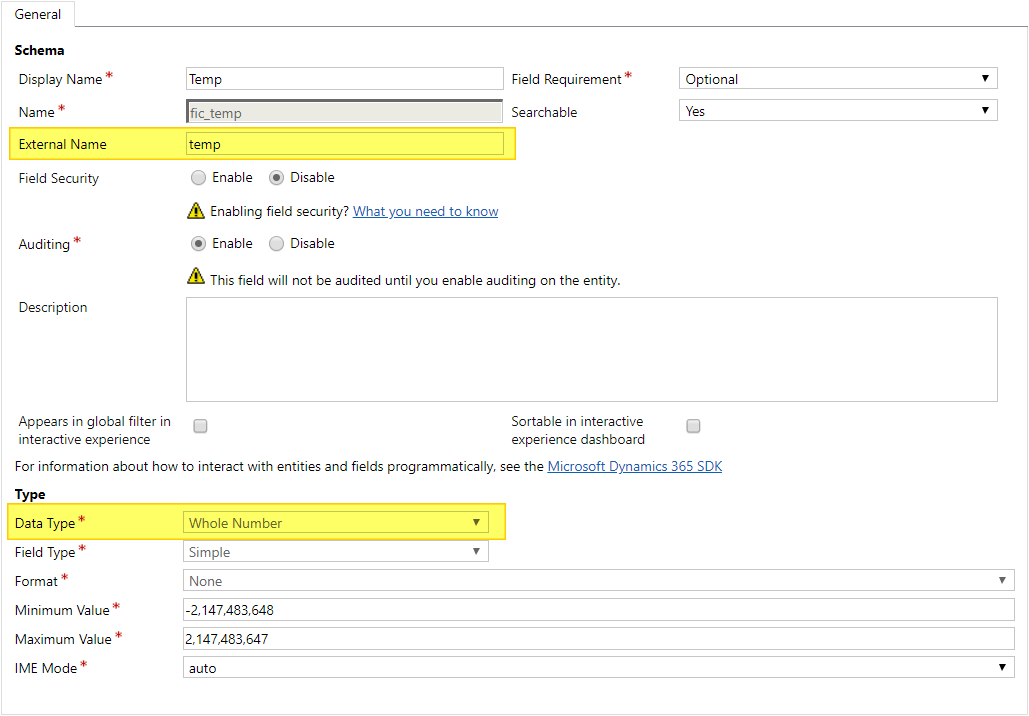
The Temp field will be Whole Number value field with External Name equals to temp.
The Sensor Type field will be Lookup field on Sensor Type entity (basic entity with just name field that must be created) with External Name equals to type.

When we have all the field created let's create some documents in Cosmos DB.
Documents in Cosmos DB
First, you need to create a few Sensor Type records so we can have GUID values for those records before heading to creating documents.
Documents must be JSON formatted objects, so in our case example would be a simple JSON object like this one:
{
    "id": "d21e03ce-2920-4300-85cb-62fc55bc229e",
    "temp": 25,
    "type": "3ef9567b-e349-4814-a938-cc0c84c5f4ee"
}
JSON Parameters that will be used are:
- id - randomly generated GUID (eg. GUID generator)
- temp - temperature value that will hold integer values
- type - GUID of a Sensor Type entity record
Add a few documents by going to Data Explorer -> db -> sensor-data -> Documents and click on New Document button**.** Input your JSON object and hit Save.
When you have a few documents in DB it's time to try our Virtual Entity in action.
Viewing Virtual Entity Data
The most basic way to see if your virtual entity is working is going to list of records of your virtual entity. If you did everything right your records should appear in the list.
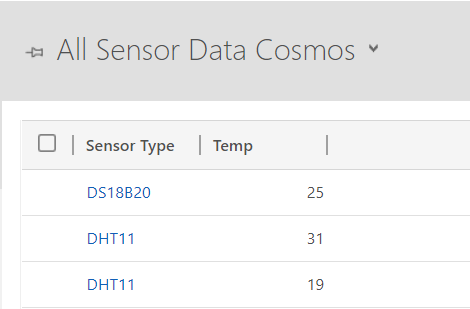
Hell yeah! Now you have working virtual entities connected to the Azure Cosmos DB.
Conclusion
As you can see it's not that hard to create a solution with Cosmos DB and Virtual entities, but there are still some bugs to be fixed.
We have used a lookup field in our virtual entity. That is populated just fine by just passing the GUID to the lookup field. You can click on the lookup field and Sensor Data will be opened.
If that is working you can consider let's do the advanced find query where we will include filter by that lookup field or add a subgrid on Sensor Type form that will show us only records for that particular Sensor Type. Everything other than list view is not possible with virtual entities, it will just show us an empty list in both cases.
I'm really looking forward to the future of Cosmos DB Virtual entities because it has such a huge potential. Imagine a very fast DB (this one is Cosmos DB) that holds tons of data (that is offloaded from Dynamics 365) that you can view it inside of entity form with just a few clicks of configuration.
I hope that this future will come as soon as possible and make our lives so much easier, but till then we need to create the custom connectors for virtual entities that will do the magic for us.
Next one up in the series, as you can expect to from my last sentence, will be creating a custom connector for a virtual entity.
